kong进阶
原文地址:https://www.douyacun.com/article/881acc2a7bfb34da960af55e7ddb0d23
这篇文章目的
- 熟悉kong的配置
- 线上已经在运行openresty,如何无缝接入kong
- 如何配置一个service
- 路由如何匹配,header/path/method/source/destination/SNI 如何配置
- 多个路由同时匹配优先级如何匹配
- 豆瓣是否如何对匿名用户和授权用户进行不同频率限流访问的
- kong是如何支持蓝绿部署,金丝雀部署
- kong的健康检测和熔断机制
配置
注入kong nginx指令
nginx_http_ 会注入到 http 块下面
nginx_proxy_ 注入到kong 代理端口 server 块下面
server {
    server_name kong;
    listen 0.0.0.0:8000 reuseport backlog=16384;
    listen 0.0.0.0:8443 ssl http2 reuseport backlog=16384;
	# ...
    # injected nginx_proxy_* directives
    real_ip_header X-Real-IP;
    real_ip_recursive off;
    # ...
}
nginx_admin_ 注入到kong 管理端口 server 块下面
server {
    server_name kong_admin;
    listen 127.0.0.1:8001 reuseport backlog=16384;
    listen 127.0.0.1:8444 ssl http2 reuseport backlog=16384;
	# ...
    # injected nginx_admin_* directives
    location / {
        default_type application/json;
        content_by_lua_block {
            Kong.admin_content()
        }
        header_filter_by_lua_block {
            Kong.admin_header_filter()
        }
    }
    # ...
}
配置server块
新增配置文件
server {
  listen 2112;
  location / {
    # ...more settings...
    return 200;
  }
}
kong.conf nginx_http_include 引入此配置文件
nginx_http_include = /path/to/your/my-server.kong.conf
自定义kong nginx模版
极少用到
- kong.conf 配置命令无法满足
- 线上已经在运行openresty实例,可以使用kong生成配置文件并且引入
模版
/usr/local/kong
├── nginx-kong.conf
└── nginx.conf
重启命令
kong start -c kong.conf --nginx-conf custom_nginx.template
嵌入kong到openresty中
kong下的文件,kong是openresty的插件,索引如果线上已经有openresty在运行的话,可以无缝衔接
[root@ali conf]# ll /usr/local/kong/
total 292
drwxr-xr-x 2 root   root   4096 May 28 14:31 bin
drwx------ 2 nobody root   4096 May 28 15:30 client_body_temp
-rw-r--r-- 1 root   root 234703 Apr 25 00:45 COPYRIGHT
drwx------ 2 nobody root   4096 May 28 15:30 fastcgi_temp
drwxr-xr-x 3 root   root   4096 May 28 14:31 include
drwxr-xr-x 4 root   root   4096 May 28 14:31 lib
drwxr-xr-x 2 root   root   4096 May 28 15:30 logs
-rw-r--r-- 1 root   root    297 Jun  1 19:18 nginx.conf
-rw-r--r-- 1 root   root   7807 Jun  1 19:18 nginx-kong.conf
-rw-r--r-- 1 root   root   1821 Jun  1 19:18 nginx-kong-stream.conf
drwxr-xr-x 2 root   root   4096 Jun  4 15:25 pids
drwx------ 2 nobody root   4096 May 28 15:30 proxy_temp
drwx------ 2 nobody root   4096 May 28 15:30 scgi_temp
drwxr-xr-x 2 root   root   4096 May 28 15:30 ssl
drwx------ 2 nobody root   4096 May 28 15:30 uwsgi_temp
启动方式:
$ /usr/local/openresty/nginx/sbin/nginx -p /usr/local/kong -c /usr/local/kong/nginx.conf
Proxy
service/route/plugins
service
可以通过rest api创建一个service,url指向服务
curl -i -X POST http://localhost:8001/services/ \
    -d 'name=foo-service' \
    -d 'url=http://foo-service.com'
url会自动解析:
- Protocol
- host
- port
- path
重试机制:
- retries 实现方式是nginx的 proxy_next_upstream_tries 模块提供的功能,如果service response error,nginx会再次请求upstream
超时时间:
- Connect timeout
- Write timeout
- Read timeout
route
匹配规则
kong支持http/https,tcl/tls,grpc/grpcs协议的代理
http:methods,hosts,headers,paths(andsnis, ifhttps)tcp:sources,destinations(andsnis, iftls)grpc:hosts,headers,paths(andsnis, ifgrpcs)
匹配规则:
- 必须命中所有的字段
- 至少命中字段配置的一个值
{
    "hosts": ["example.com", "foo-service.com"],
    "paths": ["/foo", "/bar"],
    "methods": ["GET"]
}
以下可以命中路由, host、path、method 均可以匹配到
GET /foo/hello/world HTTP/1.1
Host: example.com

GET /bar HTTP/1.1
Host: foo-service.com

GET /foo HTTP/1.1
Host: example.com
以下无法命中路由
# path没有命中
GET / HTTP/1.1
Host: example.com
# method没有命中
POST /foo HTTP/1.1
Host: example.com
# host没有命中
GET /foo HTTP/1.1
Host: foo.com
request header
host
指定多个host
json
curl -i -X POST http://localhost:8001/routes/ \
    -H 'Content-Type: application/json' \
    -d '{"hosts":["example.com", "foo-service.com"]}'
form
curl -i -X POST http://localhost:8001/routes/ \
    -d 'hosts[]=example.com' \
    -d 'hosts[]=foo-service.com'
通配符
只能使用1个*,在左边或最右边
{
    "hosts": ["*.example.com", "service.*"]
}
preserve_host
kong默认会把请求host替换成upstream的host
upstream target host
{
  "created_at": 1591585408.555,
  "upstream": {
    "id": "6baccef1-2b15-44b8-b1a5-49fce6452487"
  },
  "id": "5b4c2ac4-27c5-42bb-9ec2-41ed6c3c3e75",
  "target": "docker.for.mac.host.internal:9003",
  "weight": 100,
  "health": "HEALTHY"
}
打印一下请求头(其他无关请求头忽略)
{
    "code": 0,
    "message": "success",
    "data": {
        "header": {
            "X-Forwarded-For": [
                "172.21.0.1"
            ],
            "X-Forwarded-Host": [
                "douyacun.io"
            ],
            "X-Forwarded-Port": [
                "8000"
            ],
            "X-Forwarded-Proto": [
                "http"
            ],
            "X-Real-Ip": [
                "172.21.0.1"
            ]
        },
        "host": "docker.for.mac.host.internal:9003"
    }
}
关闭preserve_host
{
    "code": 0,
    "message": "success",
    "data": {
        "header": {
            "X-Forwarded-For": [
                "172.21.0.1"
            ],
            "X-Forwarded-Host": [
                "douyacun.io"
            ],
            "X-Forwarded-Port": [
                "8000"
            ],
            "X-Forwarded-Proto": [
                "http"
            ],
            "X-Real-Ip": [
                "172.21.0.1"
            ]
        },
        "host": "douyacun.io:8000"
    }
}
其他header
kong支持通过header来匹配路由

header中需要添加version:v1, 才可以匹配到路由
GET /api/kong/preserve_host HTTP/1.1
version: v1
否则:
An invalid response was received from the upstream server
path
kong url path 匹配必须符合前缀匹配
{
    "paths": ["/api"]
}
以下是可以匹配到路由的
GET /api/kong/preserve_host HTTP/1.1
Host: douyacun.io
默认情况下,kong代理到upstream不会改变url path
正则路径
kong支持正则路径和前缀路径匹配
{
    "paths": ["/users/\d+/profile", "/following"]
}
GET /users/123/profile HTTP/1.1
Host: ...
优先级
正则匹配可以使用regex_priority指定优先级,否则最长前缀路径优先匹配,最多规则有限匹配
[
    {
        "paths": ["/status/\d+"],
        "regex_priority": 0
    },
    {
        "paths": ["/version/\d+/status/\d+"],
        "regex_priority": 6
    },
    {
        "paths": ["/version"],
    },
    {
        "paths": ["/version/any/"],
    }
]
/version/\d+/status/\d+/status/\d+/version/any//version
strip path
像nginx alias的用法, 去掉前缀路由发送给upstram, 默认是启用状态
service
{
  "path": "/",
}
path 是 /api , 这个path是作为路由前缀的
route
{
  "paths": [
    "/api"
  ]
}
strip path 开启状态
GET /api/articles HTTP/1.1
Host: ...

404 page not found
upstream 接收到的请求
GET /articles HTTP/1.1
Host: ...
method
通过请求方法发送过滤路由
GET POST HEAD PUT
source
通过请求涞源ip/port过滤路由
10.1.0.0/16
Authentication
流程:
- 为service创建一个plugin
- 创建一个consumer
- 为consumer创建一个credentials
- 请求进入时,首先会验证权限
Consumers
主要用于自定义请求行为,为安卓/iOS创建一个consumer, 或者每个版本、每个平台创建一个consumer。这是一个不透明的概念,所以称为consumer而不是用户
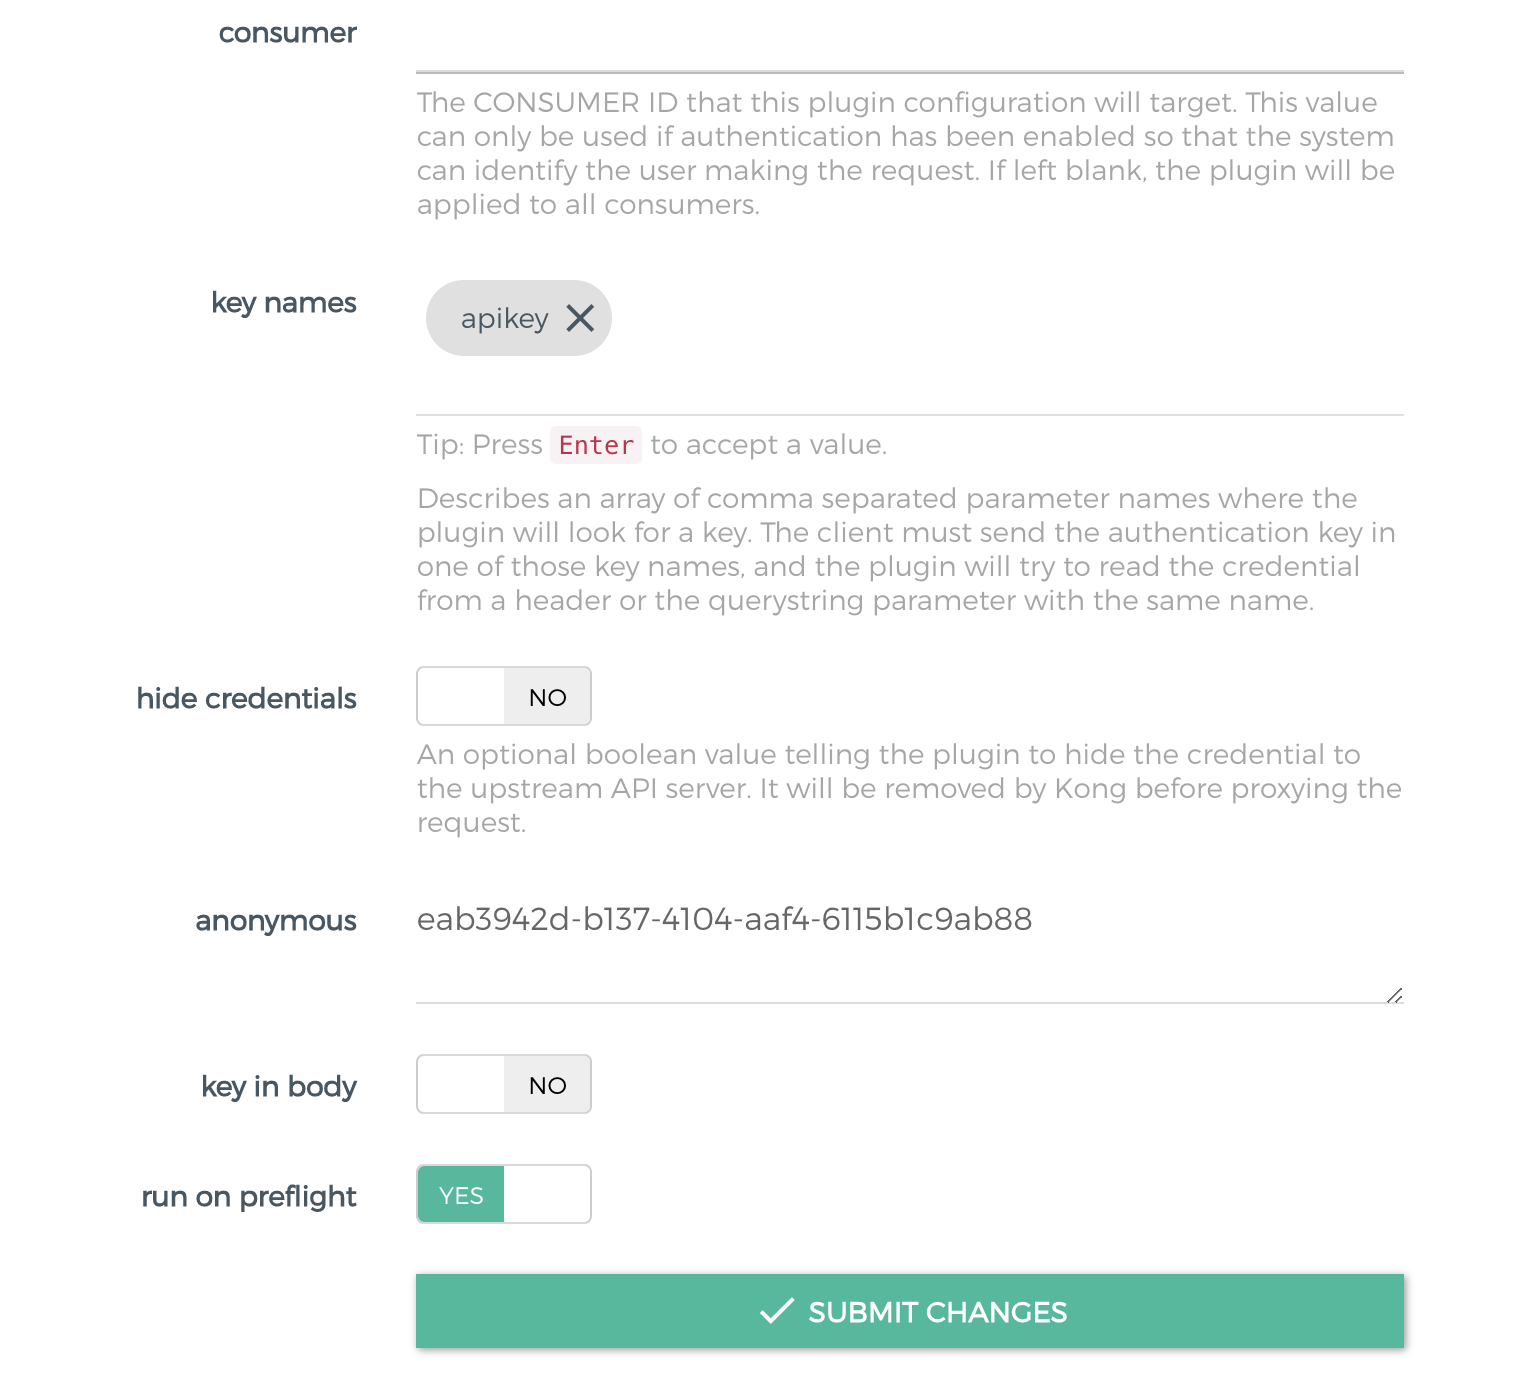
Anonymous Access
匿名访问和鉴权访问同时存在
对匿名访问进行 低频 限流,对授权用户有 高频限流
流程:
-
创建service
-
创建route
-
创建key-auth plugin
curl -i -X POST \ --url http://localhost:8001/services/douyacun/plugins/ \ --data 'name=key-auth' -
创建anonymous Consumer
curl -i -X POST \ --url http://localhost:8001/consumers/ \ --data "username=anonymous_users" HTTP/1.1 201 Created Content-Type: application/json Connection: keep-alive { "username": "anonymous_users", "created_at": 1428555626000, "id": "bbdf1c48-19dc-4ab7-cae0-ff4f59d87dc9" } -
允许anonymous Consumer访问
curl -i -X PATCH \
   --url http://localhost:8001/plugins/<your-plugin-id> \
   --data "config.anonymous=<上一步anonymous Consumer生成的id>"
最终结果,原本需要授权的url现在不授权也可以访问了, 授权的consumer也可以正常访问
6 . 针对匿名consumer创建rate limit plugin, 针对授权consumer创建rate limit plugin
curl -i -X POST \
   --url http://localhost:8001/services/douyacun/plugins/ \
   --data 'name=rate-limiting'
   --data 'config.minute=5'
   --data 'consumer.id=<匿名账户id>'
- 验证 如果没有授权访问,每分钟超过5次就会被限流
{
    "message": "API rate limit exceeded"
}
负载均衡
DNS-based loadbalancing/ring-balancer
DNS负载均衡,节点不是向kong注册服务,而是向DNS服务器提供注册,kong使用域名就可以了,
DNS各级都有缓存,缓存时间难以把控,不方便做健康检测移除不可用节点 (不推荐使用)
ring-balancer
使用ring-balancer,需要向kong进行服务注册, 使用http注册以后可以立即获取流量
upstream: 虚拟hostname,route可以使用upstream name当作hostname
target: ip/port 每个node 都会有weight权重,决定承担多少流量
upstram
修改target的成本较小,修改upstram的成本较大
slots: 根据最多设置多少个target算出,假设设置10个target,那么slot就是 10 * 100, 用于负载均衡算法,(todo:令牌?)
target
target只支持创建/删除,不支持修改,如果要改权重,删除之前的taget然后新创建一个target
target自动清理,不活跃target比活跃target多10个时会自动清理不活跃target
负载算法
hash_on
-
none: 加权轮询
-
consumer: 按照consumer id hash,负载到不同的机器
-
ip:按照 ip hash
-
header:按照指定header hash
hash_on_header指定headerhash_fallback_header:hash_on_header缺失时,替补
-
cookie: 按cookie hash
hash_on_cookie: 指定cookie namehash_on_cookie_path: 指定cookie path
hash_fallback
hash_on 返回的hash值为空,hash_fallback指定替代品
注意事项
- target尽量不要使用域名,域名解析也是需要一定时间
- 确保hash值有较好的方差平均分布
- 3个consumer,几十万的用户的 建议按ip hash
- 如果用户大多集中在统一个地区,使用同一个NAT gateway(因为大家的ip都是同一个),建议使用cookie hash
蓝绿部署
一个是当前运行的生产环境,接收所有的用户流量(称之为蓝)。另一个是它的副本,但是闲置(称之为绿)。两者使用相同的数据库后端和应用配置
应用的新版本部署在绿色版本环境中,进行功能和性能测试。一旦测试通过,应用的流量从蓝色版本路由到绿色版本。然后绿色版本变成新的生产环境。
过程:
- 创建service
- 创建route
- 创建green upstream + target
- 创建blue upstream + target
- 发布时 切换service hostname 为green hostname
金丝雀部署(灰度发布)
和蓝绿部署很像,区别在于可以阶段性进行,不用一次性全切流量
金丝雀部署可以在生产环境中基础设施小范围部署新的应用代码,一旦应用部署发布,只有少数用户被路由到,最大程度降低影响
- 在允许外部用户访问之前,将内部用户暴露给金丝雀部署;
- 基于源 IP 范围的路由;
- 在特定地理区域发布应用;
- 使用应用程序逻辑为特定用户和群体解锁新特性。当应用为其他用户上线后,移除此逻辑。
kong的实现方式使用通过设置target权重来分配流量
# first target at 900
$ curl -X POST http://kong:8001/upstreams/address.v2.service/targets \
    --data "target=192.168.34.17:80"
    --data "weight=900"

# second target at 100
$ curl -X POST http://kong:8001/upstreams/address.v2.service/targets \
    --data "target=192.168.34.18:80"
    --data "weight=100"
健康检测&熔断机制
kong支持2种健康检测,可以单独使用也可以结合使用:
- 主动监测,定期请求提供的http/https接口,根据响应决定target是否健康状态
- 被动检测,分析正在代理的流量请求,根据响应局定target是否健康状态
健康/非健康
每一个target都有独自的健康检测
健康检测的规则
- 响应码 200 Success,增加
Success计数,重置其他计数 - connect fail,增加
TCP failures计数,重置Success计数 - timeout, 增加
timeouts计数,重置Success计数 - 响应码非 200 Success,增加
Http Failures计数,重置success计数
如果TCP failures / timeouts / Http Failures 次数达到配置的阀值,target会被标记为unhealthy
如果Success 次数达到配置阀值后,target会被重新标记为healthy
健康检查配置
主动检测
healthchecks.active.http_path: 设置target 健康检测接, 默认/,常用ping
healthchecks.active.healthy.interval: 健康target间隔多少秒进行一次检测,0不检测
healthchecks.active.unhealthy.interval:非健康target间隔多少进行一次检测
healthchecks.active.type: 指定协议http/https
healthchecks.active.timeout: 连接超时时间,默认1s
healthchecks.active.concurrency: 一次请求多少个target
healthchecks.active.healthy.successes: 健康检测成功多少次认为是健康
healthchecks.active.unhealthy.tcp_failures: 连接失败多少次判定target非健康
healthchecks.active.unhealthy.timeouts: 请求超时次数判定target非健康
healthchecks.active.unhealthy.http_failures: 非 (healthchecks.active.unhealthy.http_statuses 定义的状态码) 响应多少次判定target非健康
被动检测
healthchecks.passive.healthy.successes: 非健康节点检测
healthchecks.active.unhealthy.tcp_failures: 连接失败多少次判定target非健康
healthchecks.active.unhealthy.timeouts: 请求超时次数判定target非健康
healthchecks.active.unhealthy.http_failures: 非 (healthchecks.active.unhealthy.http_statuses 定义的状态码) 响应多少次判定target非健康
禁用健康检测
设置间隔时间为0就关闭检测healthchecks.active.healthy.interval / healthchecks.active.unhealthy.interval